Grand Theft Ummagine is an Action-packed, gun-slinging game full of mystery and intrigue. No, really. Oh all right, you got me. It’s a Flash-based adventure game where you, as Stan the Kyrii, must out wit, out steal and out la… whoops, treading into copyrighted territory there. 😉 Basically, you have to steal everything that isn’t nailed down in each deserty-flavored level before you can progress to the next, and all the while the guards are hot on your little Kyrii tail.
Luckily, you have Potions of Transmogrification and Rings of Invisibility to help you out – the potions disguise you as a Guard for about 8 seconds and the rings…
well, with a name like Ring of Invisibility I think you can guess. You can still be caught if you touch a guard while invisible though, since all those years of living on the street in a hot desert haven’t exactly made you springtime fresh, and they will smell you. You can only carry one of each item at a time, and you use them by clicking on their picture inside the game interface.
But if you’re here, you probably already know how to play, and are really interested in how to WIN. So, with no further ado, the level guides! You can go to the level you want via the menu below, or just scroll down a bit.
Thanks for reading this, and I hope you find it helpful!
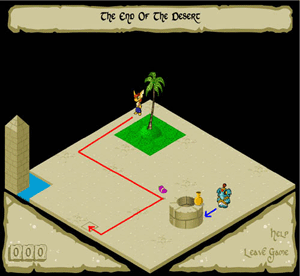
Level 1
Ok, First level – very simple. Go down, head right to the Ummagine, and wander off to the exit. You should have no trouble in this level.
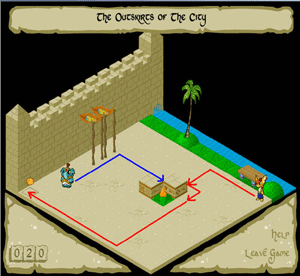
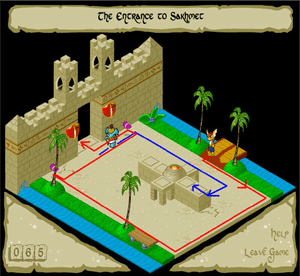
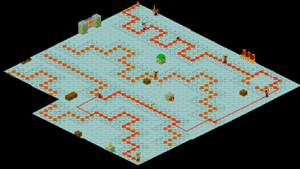
Level 2
Ok, go left, down and stop long enough for the guard to reach that awning. Then go right and down to trap him, then you’re free to nab the Puntec Fruit and exit!
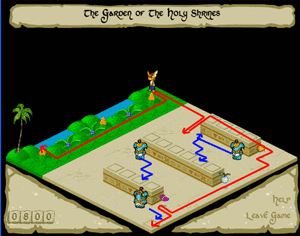
Level 3
I’ve seen both of these during my research; just use the one for your own game. Head to the middle wall and wait for the guard to notice you, then slip around, double back to that block and wait for him. When he gets close enough, go up to grab the Ummagine, double back around again and make a break for the exit! (there are easier ways also – why not invent your own? 🙂
Level 3, Alternate
This level is similar to its counterpart on the left – lure him to the block then sprint around the side to trap him, go grab the Tchea Fruit, then slip around the guard the long way and head to the exit. As always, there are often multiple ways of finishing the level – do what suits you.
Level 4
The guard starts walking towards you when you start, but Don’t Panic! 😉 simply make him trap himself in that corner there and you are home free. Just make sure not to walk on the cracked tiles, as you fall through. There’s one near where the guard gets trapped and one by the top left Ummagine, so watch out!
Level 5
The Gardener’s Revenge hedge maze is random each time, so simply keep to your left or right to get to the exit. It might take a while, but you’ll find the exit eventually. And, of course, head for the exit if you see a clear path to it regardless of whether or not it’s a right or left turn.
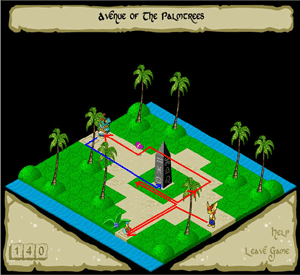
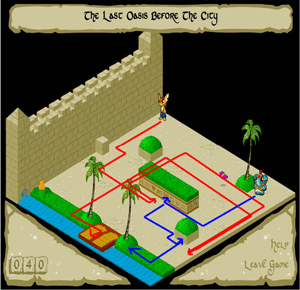
Level 6
Like level 3, level 6 contains two possible layouts. For this one, grab the potion (you won’t need it this level, contrary to what they say). Trap the guard with the obelisk (you should be getting pretty good at this now!), grab the Ummagine and exit to the left.
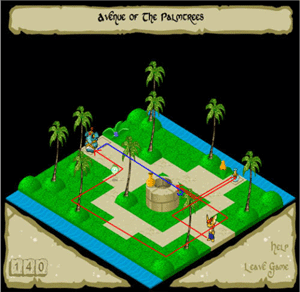
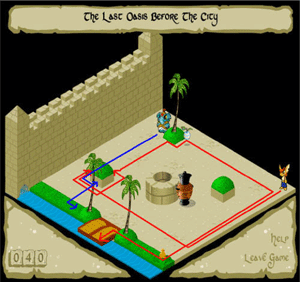
Level 6, Alternate
Same basic routine – grab the potion, trap the guard with the well, nab the Bagguss and exit. You might not need to go so far out of your way to trap him; this is just the way I did mine.
Level 7
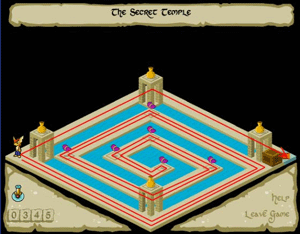
Ok, just cross the top bridge and climb the steps to the magic ring. Don’t fall through that cracked floor. Cross back across the top bridge with the ring in your possession, carefully navigate the lower bridge (don’t go too far up-left or you’ll fall off the bridge onto the ring island) until you’re almost at the end, and get ready to use your potion (you have to click on it, remember? So to get it ready, hold your mouse over it while you move into position). Use the potion, grab the Ummagine, reverse and haul booty out of there before the potion wears off. Then just head for the exit. Watch out for the cracked tile! Also, something weird…if you leave the steps going up-right and keep walking, you walk ONTO the water and jump into the air, then hover there. When you move off of the water you fall back down, but that’s still pretty odd.
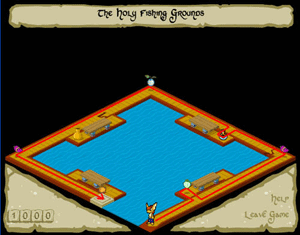
Level 8
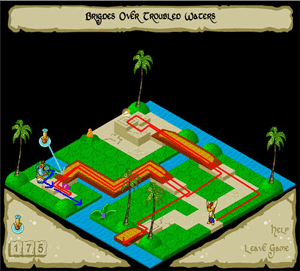
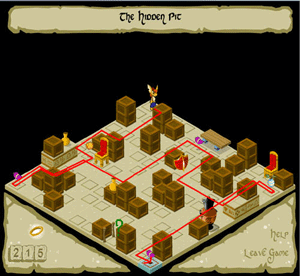
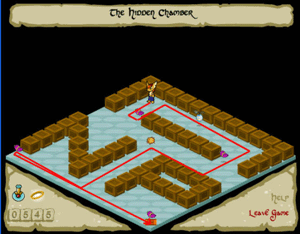
Ok folks, this is a BIG level. Head to the second palm tree and wait for the guard to chase you, then lead him down to the plus-sign-looking walls group. While you’re there grab the Ummagine, if you didn’t do it when you trapped the guard. The go between the two obelisks – it’s an entrance to the Hidden Pit level, the guide for which is below.
After you’re done there, sneak back up to grab the potion (see why you used it and not the ring last level?), then go all the way down to the stone bridge at the bottom. Ready your ring, then cross, slip it on, grab the Puntec Fruit and go down-left. Do NOT touch the guard – remember, they will still catch you if you use the ring and walk into them, unlike the potion. Wait for the invisibility to wear off, then let the guard chase you onto the bottom left bridge. Trap him in the bend, then exit the bridge and cross in the shallow water (it’s a thin strip of lighter-colored water all the way to the left). Don’t fall into the whirlpool. Grab the ring from the broken bridge without falling through, then ready it, head for the door, use it and escape!
Secret 1
Now that you’re here, just grab all the fruit and head to the blue tile. I don’t care how you do it, there aren’t any guards or tiles to watch out for.
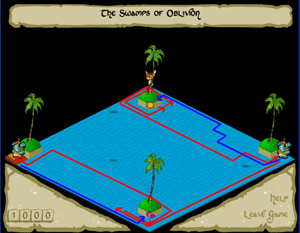
Level 9
Ah, the wonderful Three Halls of Insanity. Remember what I said about level 8 being big? Welcome to level 9! This one is actually easier than Level 8, just more tedious. You simply zigzag back and forth, and if you make a misstep you fall through the trap tiles. For the first small rooms it’s right, up-left two, cross, up-left three and repeat the crosses and up-left threes after that. For the second room, just head left at the beginning instead of right. Crossing the boundary in the second hall, make sure you head up-right immediately, as the screen changes and you might walk too far accidentally. Don’t forget the second secret room in the left corner, the map of which is below. For the big room, simply follow the path as exactly as you can. When getting the Puntec, feel free to take short steps (press the button twice quickly, once to go and once to stop) if you want to.
Secret 2
Not as tedious as Three Halls, but almost. Just wind your way around the path, collecting Ummagines as you go, and then wind your way back to leave.
Level 10
What is WITH that title? :-/ Some programmer was having fun, I imagine…Anyway, the guard starts chasing you immediately, so do your best to move so that he walks into the opening in the crates. You’re safe from him then, so head to the lower right corner, ready your potion, and dash through the narrow corridor of boxes. Use your potion as late as you can to give yourself ample time to grab the Ummagine and potion and still escape the corridor of boxes before it wears off.
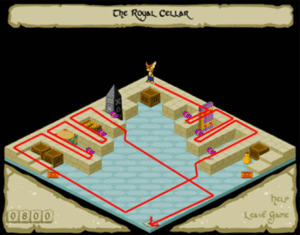
Level 11
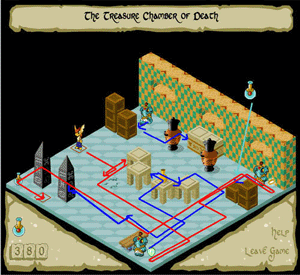
Ok, getting tougher! Walk forward to lure the guard, but don’t fall through the cracked tile. Trap him in that middle wall group for now, then take the Bagguss as you please. Now the tricky part – walk to the bottom part of the wall group, ready your potion, then race for the ring. Use the potion as late as you can and don’t waste any time, for both the wall-trapped one and the ring guarding one will soon be on your tail. That top one traps himself, so you don’t have to worry about him. When the potion wears off they will chase you some more, but you should have enough of a head start to grab the potion by the obelisks and escape.
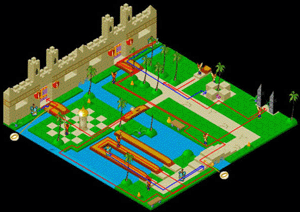
Level 12
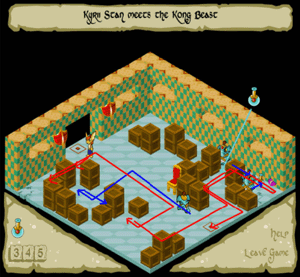
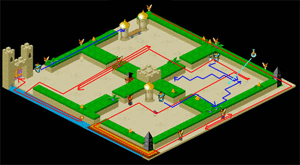
Ok wow. Just wow. This level…UGH. It is highly complicated and I don’t blame you a bit if you get stuck there, as I did myself for…well, months. 😛 It was leanbeanmiller’s wonderful written walkthrough that helped me out, and hopefully my visual guide can clarify things further.
Walk down-right initially – you’re about to make a break for safety and you won’t have time to do it later. Then walk the straight shot left, and the guard will race after you, doing a weird sort of zigzaggy move. If you’re extremely fast and accurate, you can dart into the alcove and move back to the right just before he reaches you. You want him on the OTHER side of the wall, not trapped in the doorway (and certainly not THROUGH the doorway). Get the secret behind the toilet – ah, those crazy Sakhmetians, who would have ever thought to check there? Who would have WANTED to, more like it. Walkthrough for the third secret level is below.
Once you return, walk quickly past the doorway and stop, to give that other guard a chance to notice you. Then walk back to the up-right and carefully get the guards stuck in the doorway – I guess the high life of a palace guard is hard on the waistline. I imagine this little gag looks an awful lot like something the Three Stooges would do, heh. Head left, down, then left again – the third guard should start to notice you, but you don’t have to worry about him yet. Take the time while he’s still stuck in his alcove to position yourself right across from the Tchea Fruit – you don’t want to take time out to do it later. Then just dash across to it, and time your motion so the guard traps himself against the wall. I’ve indicated where he should end up on my map, if that’s confusing to you.
With Guard #3 out of the way, head to the center room and get the Ummagine, being careful of that cracked tile by the throne. Then retrace your steps to get right in front of the Bagguss, and ready a potion. Walk down and immediately use the potion, as the guard is waiting for you. Walk to the base of the stairs and then wait for the effect to wear off. Walk up the stairs, luring him with you, and eventually Guard #4 as well. Replenish your potion supply at the top of the stairs and ready it again, then use it, hop down, get the Sphinx Links – hope they haven’t spoiled – run down-left, and hopefully you’ll be out of range by the time you change back. If not, no big deal, you’ll just have a chase to the finish. Finally, ready your ring, and continue down-left. Use the ring when the screen changes to stop the guard, dodge him, take the Puntec Fruit and exit the level. W00t!
Secret 3
If you have trouble with this level you should be playing a different game, seriously.
Level 13
Another random maze like Level 5, only bigger. Just keep to either your left or your right and you’ll eventually escape.
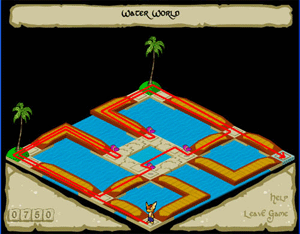
Level 14
The only trick in this level is the hidden path across the water. Don’t step in the normal water, or you’ll sink.
Level 15
First, step into the square of water marked to go to the fourth secret level. Don’t step into any of the others, you’ll sink. The guide for this level’s secret area is below.
After you return, you WILL be caught – no way that I’ve found to avoid it, but it doesn’t matter anyway (you don’t have lives and dying doesn’t cost you any points). When you restart, lure the first guard closer, then zip around the back to steal the Puntec. Grab the Tchea next – he’ll come after you, but he’ll get stuck. Get the Ummagine, ignoring Guard #2 completely. Lastly, to avoid Guard #3, go to the right edge of the screen and then race to the exit. It’ll be close, but you’ll make it.
Secret 4
Just walk along the ledges. Don’t fall until you’ve collected every fruit from that side’s ledge, or you’ll have to take the stairs back up. You can also walk on top of the crates on the left ledge.
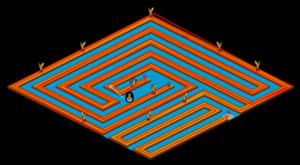
Level 16
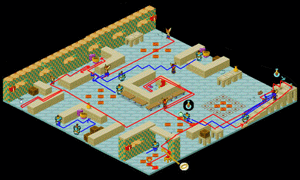
And endless and endless and endless and in other words… this level is one of the most tedious levels in the game. Start out by heading right and then down – don’t worry about the cracked tile, it’s not real. When you come to the ledge-looking part of the boardwalks, go left and follow that path all the way around until you get to the potion. Wind your way back around to where you started, then head down-left. Just follow the path around until you get near the guard, then ready the potion. Hopefully in your endless circling you got the guard to stand directly over the Ummagine. That’s what almost always happens, anyway (and no, for this map I didn’t map the guard’s movements because bleh). When you’re ready, make that last turn and use your potion precisely where marked on the map – too soon and it’ll wear off before you grab the Ummagine and race back to safety; too ate and you’ll be caught. And DO try not to get caught – it would be awful to have to do this level again. Once you have your prize and are safely hidden behind a corner, wind your way alllll the way back around to the ridge. This time don’t take it, but continue on down. Make one last round of zigzags to reach the exit, and you’re done. Phew.
Level 17
Ugh. Another maze. What’s worse is, THIS one has the path surrounded by water instead of hedges or walls, so one false step and it’s gurgle for you. Just walk carefully and stick to a direction and you’ll be fine. Or if not…at least you don’t have penalties for dying. 😛 At least this level seems somewhat smaller, as compensation for the increased danger. My biggest hint for this level is, when you get close to the very edge of the screen, tap the button for whichever direction you’re headed in to stop, which also usually jumps you to the next screen if you’re close enough to the edge. This lets you get a view of what’s ahead, and also keeps you from toppling off the path if it turns suddenly.
Level 18
Walk around the front and get both the Puntec and the first guard’s attention. Move to the back wall and trap him against the pillar in the usual way, and then sneak into the secret area he was guarding. Walkthrough for this area below. Once you return, get the Ummagine and walk forward a bit to attract the guard’s notice, then trap him against the bottom pillar and hurry on over to the exit.
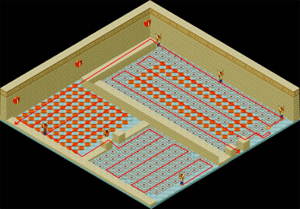
Secret 5
Don’t worry about the crack in the path, just keep walking. Make sure to get the potion – well, you HAVE to, in order to exit the area. But it’s going to be really nice to have in the second-to-last level, I can tell you that much.
Level 19
Second-to-last level now – we’re so close I can almost smell it… wait no, that’s just the guards. For being such a high number, this level is a piece of cake, especially if you found the potion from the last level’s secret area. You did, didn’t you? If not, this level can still be completed if you get the ring from the top-left quadrant, you just have to be careful not to attract the guard up top or touch either guard below. The potion makes it much simpler, trust me.
If you have it, you are a good monkey and get a cookie. Now head down-right, then down-left, and carefully lure the guard in the bottom quadrant through the narrow opening into the bottom-right quadrant. Stay put long enough for him to thoroughly trap himself in the corner, as you’ll want as much of a head start as you can get. Go into the bottom quadrant after that, taking care not to step in the whirlpool by the bridge. Grab the Ummagine, and ready your last potion. (Aww…) Dash through the entrance, timing your potion-click carefully so that you change right when the guards are closest together. You don’t HAVE to, of course, but the closer they get to each other before they touch you and stop, the farther away they get from you when your potion wears off and they come after you again. Grab the ring, grab the Tchea Fruit, then book it through the top entrance. The guards should trap themselves against the wall, just don’t let them get through the entrance and you’ll be fine.
Now, carefully move left – you want to move just enough so that the final guard sees you and tries to come after you, but winds up on the wrong side of the fence. Once he’s there, lure him to that bench alcove where he’ll conveniently trap himself against it. Tired from chasing you, I suppose? In any case, that leaves the last Puntec, the last ring, and the second-to-last exit wide open for you. Again though, don’t fall into the whirlpool.
Level 20
It’s big, it’s tricky, and it took me hours to map. You get it in a few minutes. Lucky you. Basically, some of the tiles which look cracked, aren’t. Just follow the map carefully and you should reach the end of the level, and the game, hopefully with a high score and maybe even a trophy to boot. Go you! Now they just need to make a GTU avatar and I’ll be set… – velasco
One thought on “Grand Theft Ummagine Solutions by velasco”