Difference between revisions of "The Tale of Woe plot completion"
| Line 174: | Line 174: | ||
To dig up a grave, there had to be four users (represented by their active Neopet) at the grave site, which then had to dig in sequence, each user's turn indicated to them by a pink highlight around their Neopet. To join a digging team, there had to be at least one empty space, shown by a question mark instead of a Neopet's image, around the grave, and then the form button "Join the diggers" was to be clicked. Between their turns at digging, the users clicked the "Wait" form button. | To dig up a grave, there had to be four users (represented by their active Neopet) at the grave site, which then had to dig in sequence, each user's turn indicated to them by a pink highlight around their Neopet. To join a digging team, there had to be at least one empty space, shown by a question mark instead of a Neopet's image, around the grave, and then the form button "Join the diggers" was to be clicked. Between their turns at digging, the users clicked the "Wait" form button. | ||
While digging, several items could be found by the users in the dirt. Most commonly, these were '''Spooky Doughnut'''s or '''Ghost Marshmallows''', but '''Crystal Ball Table'''s,'''Magic Ghost Marshmallows''','''Fetch! Stamp'''s, '''Meowclops Statue'''s and '''Sludgy'''s could also be found, and there were claims that '''Halloween [[Paint Brush]]'''es had been dug up also. | While digging, several items could be found by the users in the dirt. Most commonly, these were '''Spooky Doughnut'''s or '''Ghost Marshmallows''', but '''Crystal Ball Table'''s,'''Magic Ghost Marshmallows''','''Fetch! Stamp'''s,'''Mystery of Halloween'''s, '''Meowclops Statue'''s and '''Sludgy'''s could also be found, and there were claims that '''Halloween [[Paint Brush]]'''es had been dug up also. | ||
If you were not quick enough in digging, you could be kicked out of the digging team. If this happened, or if you chose to leave the digging team once you had joined, you were unable to dig for some minutes. After a coffin had been successfully exhumed, the user became exhausted and had to wait several minutes before they could dig up graves again. (This is similar to an activity in the Lost Desert Plot, as remarked by many users. Due to a shortened time limit, however, dialup users experienced difficulty, as their page load times could exceed the time limit, causing them to be removed from their digging team on their first or second click.) | If you were not quick enough in digging, you could be kicked out of the digging team. If this happened, or if you chose to leave the digging team once you had joined, you were unable to dig for some minutes. After a coffin had been successfully exhumed, the user became exhausted and had to wait several minutes before they could dig up graves again. (This is similar to an activity in the Lost Desert Plot, as remarked by many users. Due to a shortened time limit, however, dialup users experienced difficulty, as their page load times could exceed the time limit, causing them to be removed from their digging team on their first or second click.) | ||
Revision as of 18:03, 1 June 2011

|
This page is under construction |
|---|---|
| Completion of all plot participation parts needed |
The following is an in-depth look into the plot completion of The Tale of Woe.
Plot completion
The locket, the carnies and the shack
|
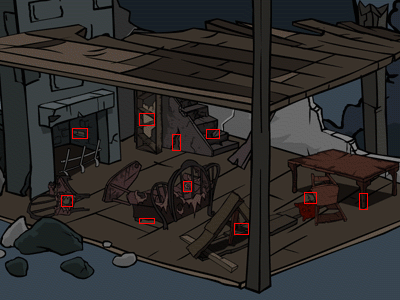
In Neovia, the user must visit the burnt-down, although fairly structurally intact, house in the lower right section of the Neovia map. At this point in the plot, this house is the only visitable place in the town.
Every co-ordinate of the map is linked, but only certain key co-ordinates produce an individual result. These co-ordinates are:
- (67,201) -- Chair
- (80,135) -- Fireplace
- (147,218) -- Couch End
- (150,115) -- Bookcase
- (175,145) -- Crack in the Wall
- (186,186) -- Sofa Couch
- (210,130) -- Broken Staircase
- (235,232) -- Broken Boards
- (308,199) -- Pillow Spring
- (364,195) -- Table Leg
The co-ordinates exist in the URL of the links. The structure of the URL used in conjunction with the locations in the map follow the following format: http://www.neopets.com/halloween/hwp/neovia.phtml?hvh=[House Code Identifier]?[x,y] thus the co-ordinates can be manipulated by changing them at the end of the URL link. This makes hopping to the above locations very easy.
When visiting the locations above, there will be one of the ten (which is random for each user) where Gilly finds the charred silver locket. A form button will appear beneath the locket, which when clicked will add the locket to the Quest Inventory.
After the locket was found, the user must head to the Deserted Fairground, where the following four characters will talk to Gilly about the locket she has found:
- Harker the Lupe, at the Bagatelle stall.
- Lyanka the Aisha, at the Cork Gun Gallery.
- Leeroy the Quiggle, at the Coconut Shy.
- Ssidney the Nimmo, at Ssidney's Scratch Cards.
The conversations appear bellow the games themselves. There have been some bugs where the conversations do not appear. Methods of rectifying it include clearing one's cache, refreshing, or playing one of the four games. Each of the characters will give a different conversation, and while these are four set characters, it is random for each user which character has which conversation. Each conversation starts with one of the following opening lines:
- "Why, certainly, little miss... Well, what a pretty little trinket this is. I haven't seen one like it in years."
- "Amazing! I haven't seen such metalwork in, oh, must be ten years. Where did you say you found it?"
- "That piece of junk? It looks like a hundred other lockets I've seen."
- "It looks familiar... where did you get it? I know someone who'd pay a thousand Neopoints for that locket, though. At least, I used to. Haven't seen her in ages."
When the characters are visited so that the conversations appear in the above order, Gilly will decide that nobody will help her there. Back in Neovia, a small path that leads away from the town becomes hyperlinked to a new site, Sophie's Shack.
Bruno's Cave
|
After visiting Sophie's Shack, Sophie will run the user off. Clicking the form button bellow, "Flee in Terror", will bring Gilly to a dark cave. Clicking the "Go into the scary cave..." button will send Gilly inside.
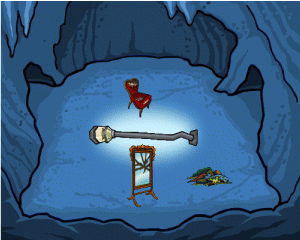
The cave is unique to everyone, but consists of a 3 x 3 grid of rooms, which all have at least one doorway into them. In the cave, there are several items, some of which can be carried and some of which can't. The chest and the table cannot be picked up, but the lamppost, chair, mirror, rotten food, and key can. Additionally, at least one of the rooms will have a pool of moonlight in the centre.
The user can pick up one object at a time, and can be placed down at a certain co-ordinate in the same way as the user searched for the locket in Neovia.
When moving about the cave, occasionally the message "Something seems to be following you..." will appear under the picture of the room. It will eventually catch up with you, and it will scare Gilly into a random room. By placing the Rotten Food object on the ground in one of the rooms, when the monster passes through it, they will, instead of scaring Gilly into a random location, stop and eat. They will then become disoriented and run off to a random room.
The user must set up a trap in a moonlit room in order to illuminate the creature. To do this, the following items must be placed at the following co-ordinates of a room with a pool of moonlight in the centre:
- Mirror at (240,330).
- Lamppost at (240,215).
- Chair at (235,160), or sometimes (225,155).
- Rotten Food at (330,325).
When the monster follows Gilly into the room, it will eat the bait, see its reflection in the mirror, stumble backwards over the lamppost, crack its head on the chair and collapse into the light.
Finding Ilere
|
When the user returns to Sophie's Shack, a section of dialogue will be visible of the troupe - Gilly, Sophie and Bruno - where they decide to head out to find Ilere.
There are three sections to find Ilere, each section works in a similar way. Each section is a Flash maze, where you will see a screen with several paths leading from it. One of these (except for the first screen of each maze) will take the user back to the previous screen. In each section, there is an item, or several items, that must be collected to advance.
The Swamp
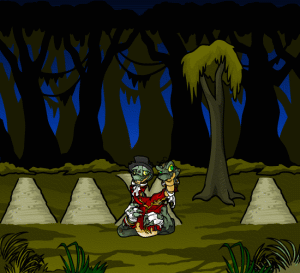
In the first section, there is a Two-Headed Hissi blocking one of the paths. When the user clicks on him, they are told that one of the Hissi's heads will always speak the truth, and the other will always lie. The Hissi is too busy arguing with himself to listen to any questions you give it, so the problem cannot be solved simply by using logic.
The user must find a stick in the maze, and click on it to bring it into their Quest Inventory. The user must then return to the Hissi and, by clicking on the stick in the inventory then on the Neopet, prod it. One of the Hissi's heads will deny that you poked it, so the other head must be telling the truth. This opens the way into the next section.
The High Woods
|
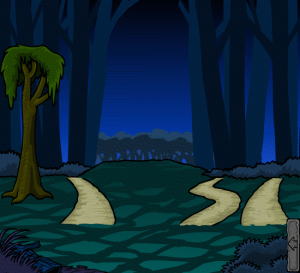
In this segment, there is a clearing somewhere in the woods where there is a break in the trees. There is a cliff at the break, and to proceed, you must descend it.
Around the maze are five types of vine, six of each, which can be picked up in the same manner as the stick in the previous section. These vines must be assembled in a combination, random to each person, to construct a rope for a descent of the cliff.
An effective way of determining which combination to use is to drop all vines at the clearing by clicking them in the inventory and clicking on the terrain, putting them into piles of type, and then trying with six of each in one's inventory until the user is shown a cutscene of the cliff, where the rope is too short. The user should add a vine from the next pile to the inventory, and continue doing so, testing after each vine, until the rope becomes too weak or the bottom is reached. In the former event, the last vine added should be removed, and a vine from the next pile included, with the process continuing.
Once the vine-rope reaches the base of the cliff, the three Neopets will climb down, and the next section will start. Note that it is possible to construct a rope with more than three sets of vines, but inadvisable; the rope will then be snatched away by a monster, and the vines scattered through the woods again.
The Deep Woods
|
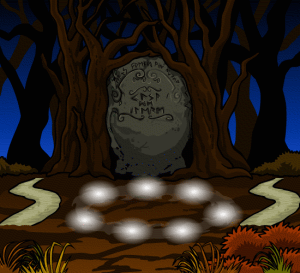
In this maze, the object is to collect the seven ghost Meepits, and then use them to open the lock to Ilere's tree residence.
When the user first encounters a Meepit in the forest, it will run away. After this happens, the user must play Meepit Juice Break and send a score of 400 points or more. This will place a glass of Meepit Juice into the Quest Inventory. The next time a Meepit is encountered, clicking on this in the inventory, then clicking on the Meepit, will offer the juice to the Petpet. The juice will splash through it, however, and it will run off. Sophie will turn the Meepit Juice into Ghost Meepit Juice, and when the above procedure is repeated, this time the Meepit will become entranced and follow as part of the Quest Inventory.
Once all seven Meepits are collected, Ilere's tree must be found. It is covered by a stone barricade, engraved with runes, and seven spots of light sit on the floor in front of it. Clicking on the Meepit picture in the Quest Inventory, then on the floor, will cause the seven Meepits to hop onto the spots. The Meepits must be rearranged, by clicking two of the Ghost Meepits (which will exchange their positions), until all the Meepits are dancing. Visual hints make this relatively simple:
- Happy Meepits are one space from their proper position.
- Staring Meepits are two spaces from their proper position.
- Sad Meepits are more than two spaces from their proper position.
As there are only seven positions, this reduces the possibilities to two for each Meepit.
When all the Meepits dance, the stone door will move and Ilere's home will be open.
Fetching the books
|
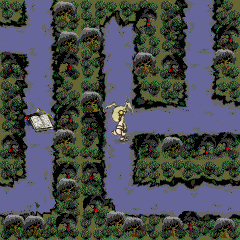
The user next needs to find the graveyard of the Spirit. At the Game Graveyard, there is a new picture of The Caretaker's Vault: click on it to enter.
The Caretaker (an easily-angered blue Yurble) angrily informs the user that his indices are missing. Without them, he cannot locate the graveyard or grave of anyone.
The books must be found. If the user plays Fetch! on hard difficulty, they will find a pile of books somewhere in the maze. When the user reaches it, as it's certainly not what the Master asked for, you'll be told to "Flee", with that being the only button on the page.
After clicking the "Fleeing sounds pretty good right now..." button, the Fetch! game is over; when the user returns to the Caretaker's vault, the Yurble will be happy to see the return of his records.
Gravedigging
With the indices carefully checked, the user then must begin to search for the correct grave. There are three different tasks to perform as part of this section: digging up the graves, retrieving potion ingredients to increase the drops of potion available, and using the potion on dug up bones in order to determine if it is a bone from the Spirit of Slumber.
These tasks are not performed in sequence and finished in the same way as finding Ilere. Every single grave from a multitude of graveyards must be dug up, and every single grave tested with the potion. It is a dauntingly huge task, but fortunately, every user working on the plot works together, much like working on the repository of the Lost Desert Plot.
To start searching for the Spirit's mortal body, the user must visit the Caretaker's Vault again and click the "Examine the graveyards list" button. Then, a graveyard must be selected from a list of graveyard designations, and the user is brought up to the graveyard's control panel, where each task can be selected.
Finding Ingredients
|
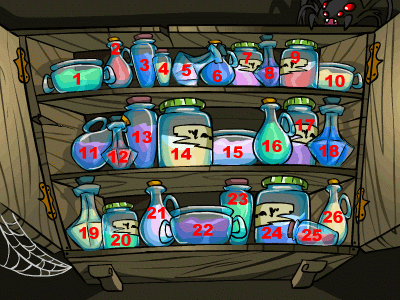
On the control panel, the third option was to retrieve ingredients for Sophie. She would give you the name of the ingredient, and the user would then visit her Shack (entering it by clicking on the door) and retrieve the appropriate ingredient. The user returned to Sophie, and was rewarded 50 NP if the vial is correct.
There were no labels on the potions in Sophie's Shack, however. At the end of the URL for each unlabeled ingredient was an ID number. The ID conformed to a certain ingredient. The known ID and ingredient matches were:
- ID 1: Bagguss Juice
- ID 2: Juppie Extract
- ID 3: Kadoatie Essence
- ID 4: Tanglevine Sap
- ID 5: Liquid Chokato Mould
- ID 6: Moonwater
- ID 7: Liquid meepit
- ID 8: Slorg Slime (never used)
- ID 9: Bloatershroom Extract
- ID 10: Liquified Bumroot
- ID 11: Crushweed juice
- ID 12: Boiled tree bark
- ID 13: Worm snot
- ID 14: Soaked Babaa Wool
- ID 15: Spicy Mortogberry
- ID 16: Jurple butter
- ID 17: Boiled Meowclops Saliva
- ID 18: Barkroot Dew
- ID 19: Watery Dung (never used)
- ID 20: Grundo Goo
- ID 21: Powdered Bloodfern
- ID 22: Pureed sharpgrass
- ID 23: Mutant Gruel
- ID 24: Evaporated Snorkle Juice
- ID 25: Ghostbeef Essence
- ID 26: Zomutt Mucus
Digging graves
|
This section of the plot began October 20, 2006, and was completed October 23, 2006. The graveyards are no longer active.
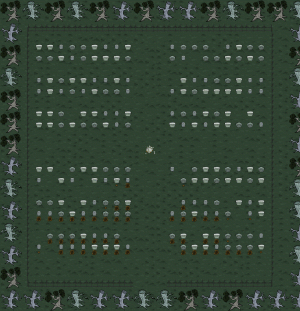
Clicking the 'Enter graveyard' button brought the user to a map of the graveyard. The graveyard was divided up into many squares. The square the user was currently on was shown by a black border around the square. The user moved around the graveyard by clicking other squares to go to them (the user could only click on squares they could reach from their current position without walking over graves or barriers).
Many of the squares contained gravestones. If the gravestone had a small pile of dirt in front of it, it signified that the digging was underway. If there was a large section of dirt in front of it, it signified that the grave was open and empty. If there was a large section of dirt with bones in front of it, it signified that the grave was open and the coffin exposed. If there was no dirt in front of it, digging had yet to begin (although diggers may be waiting to commence).
To interact with a grave, the user had to be on a square adjacent to one, then click the grave's square.
To dig up a grave, there had to be four users (represented by their active Neopet) at the grave site, which then had to dig in sequence, each user's turn indicated to them by a pink highlight around their Neopet. To join a digging team, there had to be at least one empty space, shown by a question mark instead of a Neopet's image, around the grave, and then the form button "Join the diggers" was to be clicked. Between their turns at digging, the users clicked the "Wait" form button.
While digging, several items could be found by the users in the dirt. Most commonly, these were Spooky Doughnuts or Ghost Marshmallows, but Crystal Ball Tables,Magic Ghost Marshmallows,Fetch! Stamps,Mystery of Halloweens, Meowclops Statues and Sludgys could also be found, and there were claims that Halloween Paint Brushes had been dug up also.
If you were not quick enough in digging, you could be kicked out of the digging team. If this happened, or if you chose to leave the digging team once you had joined, you were unable to dig for some minutes. After a coffin had been successfully exhumed, the user became exhausted and had to wait several minutes before they could dig up graves again. (This is similar to an activity in the Lost Desert Plot, as remarked by many users. Due to a shortened time limit, however, dialup users experienced difficulty, as their page load times could exceed the time limit, causing them to be removed from their digging team on their first or second click.)
The graveyard could be left by leaving through the gate the user arrived next to. This took the user back to the control panel.
Testing bones
In order to test whether the dug up bones are those of the Spirit of Slumber, the user took some potion from the control panel, entered the graveyard and found an open grave. The user could "Wait" at a grave being dug up until the coffin was exhumed to test it, as well as looking for a coffin already available.
If the user was first to the coffin with the potion, they were asked to "Continue", and were then given the mass and volume of one of the bones. They were then asked to decide how many drops of potion, up to 250, were needed to test the bone correctly. The formula for working out the number of droplets needed was: ((mass/volume)^2)*25, that is, the mass divided by the volume, squared, times 25. The result was to be rounded to its nearest whole number.
After testing a bone, the user saw whether or not the bone was the Spirit's. If it wasn't, the user gained 150 NP and had to wait a while before being able to test a bone again. The user could return the potion to Sophie on the control panel after taking it if they were unable to, or did not wish to, test a bone. They would not be able to use the potion again for a few minutes.
Process of elimination
This activity has now been closed on October 28, 2006.
With the bones found, it was time to eliminate all the names that were not the Spirit of Slumber. The user had to go back through the graveyards, clicking on gravestones to add the name to the list of checked stones; the stone would then receive a red mark at the upper right to signify that it had been noted. As before, new graveyards were added to the list as old ones were marked off.
The Summoning Potion
With Bruno as the volunteer, it's time to mix the potion that will allow the Spirit of Slumber to inhabit his body. Upon arriving at Sophie's Shack, the user receives a conversation in which Sophie reveals that, while her book has a general description of the required potion, it has no specific list of ingredients or amounts. She simply has to experiment.
In this activity, the user has a series of ingredients to mix in order to arrive at a specific colour of potion. The colours of potion are defined in steps, as follows:
- Red
- Green
- Blue
- Purple
- Grey
- Pink
- Swirl: Red-Yellow-Blue
- Mint Green with Yellow Streaks
- Sparkling Purple
- Silver and Red
The ingredients the user starts with are:
- Bumroot
- Leafy Slorgblossom
- Crushed Jurpleberries
The activity is constructed as a maze of sorts: Starting from Red, the user must "navigate" to a series of "destinations", correlating to different colours. Complicating matters, the "navigation" must contain no more than a maximum number of "steps", defined as an individual ingredient being added to the cauldron. If the maximum step number is exceeded, the potion turns to black sludge, and the user must start over. (This is mildly similar to the "Fetch!" game, used earlier in the plot, in which a set number of life points are expended with each move.)
The first potion destination is Purple within three steps. Once arrived at, Bruno drinks the potion...and all of his fur grows long and shaggy.
("I suppose you think this is funny?" -- Bruno)
For the second attempt, Salt is added to the list of ingredients. The second potion destination is Swirl: Red-Yellow-Blue, within five steps. Once arrived at, Bruno drinks the potion...and shrinks to a size smaller than the potion bottle.
("I always wanted a little brother." -- Sophie)
("I live solely for your amusement, sister." -- Bruno.)
For the final attempt, Bronze Sansam is added to the ingredients list. The third potion destination is Silver and Red within nine steps. Once arrived at, Bruno drinks the potion...
("I just hope I don't explode..." -- Bruno)
Halloween
| Name | # 0f Wins Limit | Difficulty | |
|---|---|---|---|
| 1st Wave | |||
| Ominous Stones |  |
17 < ? > 31 | 8 |
| Macabre Stones |  |
17 < ? > 39 | 10 |
| Furious Stones |  |
18 < ? > 32 | 12 |
| 2nd Wave | |||
| Black Elm |  |
20 < ? > 23 | 15 |
| Blathering Beech |  |
14 < ? > 21 | 30 |
| Savage Sycamore |  |
10 < ? > 20 | 50 |
| 3rd Wave | |||
| Herman Dorfdrap |  |
10 < ? > 21 | 55 |
| Bennie the Jub |  |
10 < ? > 20 | 100 |
| Disgruntled Townspeople |  |
1 < ? > 250 | 200 |
| 4th Wave | |||
| Shrieking Shadow |  |
10 < ? > 35 | 50 |
| Creeping Shadows |  |
14 < ? > 20 | 75 |
| Malevolent Shadow |  |
10 < ? > 15 | 150 |
Users could fight against opponents in the Battledome starting Thursday, November 2, fighting set fighters with each new part of the plot which was released. Unlike previous plots were points were calculated by the type and number of opponents defeated, a limit to each opponent was given, only allowing a certain number of points to contribute to their score.
There were many errors which occurred with this portion of the plot, the first occurring with the release of the first wave, which was added to the bottom of the 1-Player Challengers list on the evening of November 1st before the Battledome became war opponents only. During the first and second wave of challengers, so many users were capable of defeating the opponents and fighting all at once, crashing the Battledome servers continually. It wasn't until the third wave load times returned to normal, due to not many users capable of fighting against them.
The Curing Potion
...to be added...
The Meepit Oaks Sanitorium for the Psychologically Fragile
...to be added...
The return to Neovia & finale
| Mayor Thumburt | Difficulty |
|---|---|
 |
10000 |
 |
100000 |
 |
100000 |
Users were challenged by Mayor Thumburt and needed to face him in the Battledome. defeating him alone was impossible by any one Neopet, due to his large amounts of HP and ability damage a Neopet for 800 HP regardless how much they defended. To defeat him, the collective users of Neopets needed to lose against him constantly, doing what damage they could against him, which would lower his total HP. He attacked in three different forms, each form more powerful than the last. Users were awarded points for losing against him to a limit of 7 - 33 times (as the correct number isn't known yet).